jeudi 20 septembre 2012

Gemini Rising Trailer

Finally! near one year after I delivered my alien animation, the movie will release.
Working on this Syfy production was a great experience.


click the picture to watch the trailer


mardi 4 septembre 2012

Snail

An old model I decided to complete and animate. Everything is Blender, basic lighting with area lights and AO with internal renderer.


jeudi 23 août 2012

Looping Motion Capture in Blender

free motion Capture BVH :
https://sites.google.com/a/cgspeed.com/cgspeed/motion-capture/cmu-bvh-conversion/bvh-conversion-release---motions-list


Text version of the tutorial:

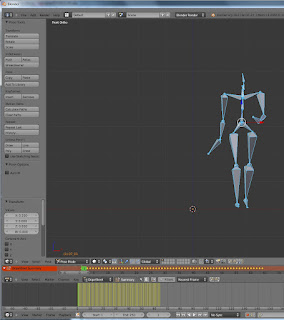
import a bvh. In object mode, scale it down in the scene (s*.2).
In pose mode, at frame 1, select all and scale down the DopeSheet frames (s*.2) to obtain a realistic motion timing.


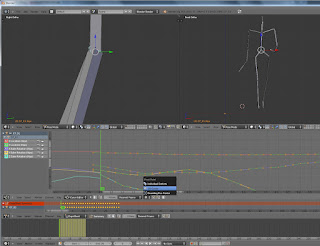
Display the F-Curve Editor, select all then simplify keyframes (>key/Clean Keyframes)


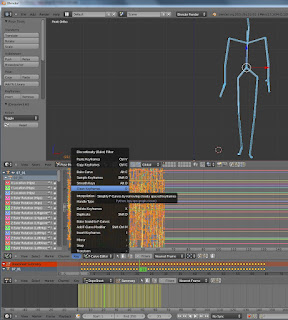
set Keyframe handle type to Vector (V/vector)
set the extrapolation mode to cyclic so the animation will loop forever (Channel/extrapolation/Make cyclic)
Select the hips bone then delete the Z location keyframes so the rig will walk in place.


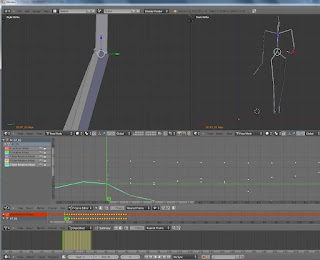
Choose the looping range of frame (from left leg contact to left leg contact). Delete out of ranges, then bring the start frame to frame 1.
Adjust the timeline to the animation.


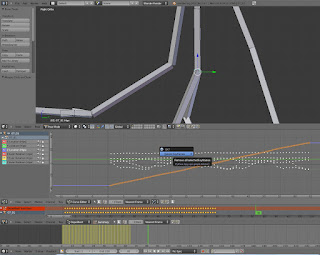
Set the f-curve editor pivot to 2D Cursor.
Select a bone then lock all the animation track exept one. Select all the frame then point the 2D Cursor right on the first frame in the F-Curve editor.


Hit R (+Shift for more precision) and rotate slowly to match the last frame to the first one.
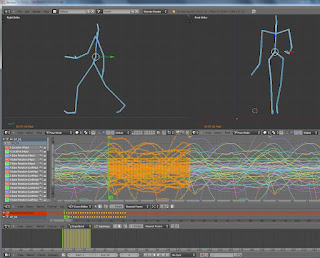
Do it for all the bones, all the animated tracks until all the animation curves are smoothed at start/end loop.
!! Ctrl+MMB over the F-Curve Editor= scale the curve display


*********************************************************************************

Modifying The T-pose
Create a reference animated rig by duplicate the rig then move it to another layer.
In Edit Mode, on the final rig, adjust the arm angle for the T-pose.
Now when diplaying both animated rigs, you can see the arm animation has been impacted on the final rig.
In Pose Mode, select the left arm bone, add a rotation constraint pointing to the reference rig left arm bone. same for the Right arm.
Now animation is correct. in Pose Mode,Pose/animation/bake Action menu, uncheck "selected only" and adjust the range.Hit OK.
You can now delete the reference rig.


lundi 13 août 2012

testing new Blender fire

here is a test with the new fire shading and emission mapping...
 More infos on the release here


mercredi 18 juillet 2012

vendredi 29 juin 2012

EzCarRig Blender edition

I am working on a Blender version of my 3dsmax paramatric car rig.
The rig is a very easy to use setup. You can adjust car width, lenght, wheel size to match you car model. To animate you just need to play with one distance entry. Stay tuned...
Here is the first preview.


jeudi 31 mai 2012

blender and AE batch render *.dat

The simpliest way to batch render several scenes with blender is to create a text file based on the following and change the extension from *.txt to *.dat.

for animation:
"C:\Program Files\Blender Foundation\Blender\blender.exe" -b E:\TRAVAUX2\SHOT1.blend -o E:\TRAVAUX2\RENDERS\SHOT01\ -F PNG -s 001 -e 300 -a "C:\Program Files\Blender Foundation\Blender\blender.exe" -b E:\TRAVAUX2\SHOT3.blend -o E:\TRAVAUX2\RENDERS\SHOT03\ -F PNG -s 001 -e 300 -a "C:\Program Files\Blender Foundation\Blender\blender.exe" -b E:\TRAVAUX2\SHOT4.blend -o E:\TRAVAUX2\RENDERS\SHOT04\ -F PNG -s 001 -e 220 -a
for stills :

"C:\Program Files\Blender Foundation\Blender\blender.exe" -b E:\TRAVAUX2\blend1.blend -o c:\pic1\ -F PNG -x 1 -f 2


AE batch everything in the project Render Queue:
"C:\Program Files\Adobe\Adobe After Effects CS6\Support Files\aerender.exe" -project E:\test.aep

Windows shutdown ( -t 00 = seconds before shutdown) :
c:\windows\system32\shutdown -s -f -t 00

mercredi 30 mai 2012

double sided material


I am animating a page turn with textures mapped on both sides. I met some problems with projected UV and double side mapping. Here's my turnaround :

 -I first animate a plan with non-flat start due to the book curvature. -the best way to project the UV (one by side)from the camera view (particular need for me) was export the page animation (with 2 modifiers) as lightwave mdd then import the mdd back on the plan after killing the modifiers. Mdd solution convert animation to one shape per frame. At the wanted frame, select the actual shape, create a square texture in the image editor then select the page in edit mode then project UV from camera view. Done
Same thing for the last frame with last shape. You have now both front and back UV .

-Create 2 materials for both sides.

-Create a node material with the 2 materials linked to a Mix node. Use a Geometry node Front/Back linked to the Mix Factor.

-Back in the 2 materials textures entry, choose the appropriate UV

Done

Now, here's the problem I met: trying to project UV from the camera on a animated mesh with the UV Project modifier fail most of time. Project UV from view doesn't work whith the modifiers because done in edit mode. To obtain a correct UV from Project UV from view you need to open a square texture in the image editor. Using texture with material node results overbright textures compare to standard material. No official solution except from RGB curves correction. The back side texture can not be anti aliased.

dimanche 6 mai 2012

mercredi 18 avril 2012

keyframe and rigid bodies in Blender


How to create keyframed objects interaction with rigid bodies in Blender:

1-Animate one object with keyframe. Name the Action in the DopeSheet.
2-Switch from Blender Render to Blender Game for the Rigid Body simulation.
3-Set the simulation objects to RigidBodies and the keyframed object to Static in the Physics menu.
4-In the LogicEditor, set the keyframed object like this:
sensor: Always/controller: And/acuators: Action then set the action to the one you ve done in "1" and adjust the start and end value.
5-Hit P. hit ESC to stop
6-To keyframe the entire simulation you first need to match FPS from Render menu (in Blender Render mode) to the Blender Game world FPS. Then check Record Simulation ON in the the Game top menu. Hit P.

mercredi 25 janvier 2012

Production with Blender Cycle


I've done my first production work rendered with Blender Cycle. Render was very fast at 15 or 25 sec /frame. Compositing and fx was done with after effects.


vendredi 6 janvier 2012

new year e-card

Here his a "quick and dirty" newyear e-card I ve done. I ve done the music, edit and design/compositing.


>vidéo

jeudi 5 janvier 2012

Compositing setup - Blender (cycle)

I ve just done a compositing setup with blender and Cycle Render: